Beltane Recipes
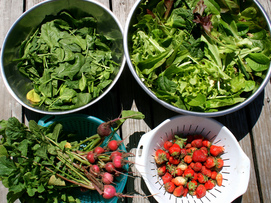
Early garden produce forms a mainstay of Beltane cooking: baby carrots and radishes, the first of the peas, lettuce and other greens. Herb gardens release a bounty of fresh leaves. The first fruits are appearing, such as strawberries. Some wildcrafting is still possible. Most farmer's markets are open by now, and roadside stands begin to appear in some areas. Seasonal colors include green and gold or yellow, along with red and other bright hues. For background information and ritual ideas, see our main Beltane page.
Fresh Herb Topping
Ingredients:
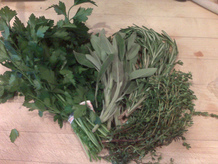
several sprigs of Italian flat parsley (about 1 tablespoon)
several sweet basil leaves (about 2 teaspoons)
1 sprig of sweet marjoram
1 sage leaf
Directions:
Wad up the Italian flat parsley and use kitchen scissors to snip into flakes over a small bowl. Cut the basil leaves in half lengthwise, then stack them together. Snip into flakes over the bowl. Strip the leaves off the sweet marjoram stem. Wad up the leaves and snip them into the bowl. Cut the sage leaf in half lengthwise, then put the halves together. Snip into the bowl. Toss gently to mix the herbs together.
Sprinkle over buttered, toasted slices of Italian bread or over spaghetti. This recipe makes about 2 tablespoons of topping, which is enough for about 4 people.
Notes:
This combination uses Italian herbs. I designed it to go with the spaghetti I was serving for supper, so I used a similar combination of herbs to the spaghetti sauce. The flavor is vivid, with green and floral notes that leap into the air. However, all kinds of fresh leafy herbs would work for similar purposes. Just mix and match based on what you're growing and what herbs are in the other recipes you've chosen.
I use kitchen scissors because that's the easiest way for me to mince herbs. You can also use a chef's knife or a food processor if you prefer. The food processor is probably a good idea if you want to make a larger amount of this -- it should scale up just fine.
This recipe was originally published in The Wordsmith's Forge on 6/14/11, then revised for reprint 6/24/11.
Fresh Herb Vinaigrette
Ingredients:
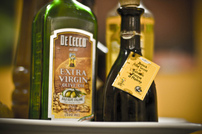
3/4 cup extra-virgin olive oil
3 tablespoons apple cider vinegar
2 tablespoons balsamic vinegar
1 tablespoon honey
1/4 teaspoon Australian pink salt
1/4 teaspoon rose baises peppercorns
1/4 teaspoon black peppercorns
1/8 teaspoon garlic paste
4 basil leaves
4 sprigs flat Italian parsley
4 sprigs thyme
1 sprig sweet marjoram
1 sprig lemon balm
Directions:
In a small mixing bowl, combine 3/4 cup extra-virgin olive oil, 3 tablespoons apple cider vinegar, and 2 tablespoons balsamic vinegar. Whisk in 1 tablespoon honey until thoroughly blended.
In a mortar and pestle, grind together 1/4 teaspoon Australian pink salt, 1/4 teaspoon rose baises peppercorns, and 1/4 teaspoon black peppercorns. Add to the mixing bowl and whisk ingredients again. Add 1/8 teaspoon garlic paste and whisk to combine.
Use another small bowl for the fresh herbs. Cut the basil leaves in half lengthwise, then stack them together. Snip into flakes over the bowl. Wad up the Italian flat parsley and use kitchen scissors to snip into flakes over the bowl. Strip the tiny leaves of thyme off the stems and add them whole. Strip the leaves off the sweet marjoram stem. Wad up the leaves and snip them into the bowl. Strip the leaves off the sweet marjoram stem and the lemon balm stem. Wad up the leaves and snip them into the bowl. Toss gently to mix the herbs together. Add all the herbs to the oil-and-vinegar base in the other bowl, then whisk again.
Pour off the vinaigrette into a bottle. Shake before serving. This also makes a tasty sauce or marinade for robust meats such as beef, as well as its original purpose as a salad dressing.
Notes:
The standard formula for vinegar-and-oil salad dressing uses 3 parts oil to 1 part vinegar. You can see that this recipe uses a bit more vinegar. That's because the honey makes it sweeter and stickier, so it needs extra vinegar for balance.
Use a fancy, full-flavor olive oil for this recipe if you have it. The lighter versions are too bland and the low-grade ones are too harsh.
Apple cider vinegar has a sweet, fruity flavor. Balsamic vinegar is darker, with a complex bittersharp flavor. If you don't have balsamic vinegar you can use all apple cider vinegar. Red wine vinegar should also work well in this recipe.
Honey is an emulsifier. It makes the oil and vinegar mix together much better than usual, and stay mixed for a while rather than separating almost instantly. The result is a dark, thin sauce that sticks pretty well to salad leaves.
Australian pink salt is a fancy salt with a light, complex mineral flavor. It works well with sweet or fruity dishes. You can substitute sea salt or plain table salt.
Fresh-crushed pepper has more flavor than ground pepper, but either will work. The rose baises peppercorns are pink or red and have a fruity, spicy flavor. If you don't have any, use all black. Any kind of black peppercorn is fine.
Garlic paste is an easy way to keep garlic available all the time. If you have fresh garlic, use one small clove, minced.
Fresh herbs are ideal for salad dressing that will be used immediately. If you're going to store it in the refrigerator for a while, dried herbs will probably work better. You can tinker around with different herbs depending on what you have, what you like, and what you're using in other recipes.
I originally served this over a salad made with assorted baby lettuces, baby spinach, and a bit of French sorrel; plus carrots, radishes, and green onions.
This recipe was originally published in The Wordsmith's Forge on 6/17/11, then revised for reprint 6/24/11.
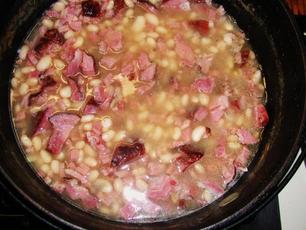
Ham and Beans
Ingredients:
1 (12 oz.) bag dried beans
water
1/2 to 1 lb. ham
1/2 teaspoon Saigon cinnamon
1/2 teaspoon garam masala
1/2 teaspoon salt
freshly ground black pepper to taste
Directions:
Pour the dried beans into a colander and rinse them. Put the beans in a large crock pot and cover with fresh water, about twice as much water as beans. Add the ham. Put the lid on the crock pot and turn it on Low.
For the next 1-2 hours, stir occasionally and keep an eye on the water level. The beans will soak up a lot of water. Don’t let them run dry, but don’t overfill either. When they have soaked up as much as they can hold, the liquid level should be at or just below the surface of the bean layer.
Add 1/2 teaspoon Saigon cinnamon, 1/2 teaspoon garam masala, 1/2 teaspoon salt, and some freshly ground black pepper. Stir. Put the lid back on and cook for another 1-2 hours.
Stir and taste the beans. They should be starting to get tender so you can tell how the spice blend is working. Adjust spices if necessary.
Continue to cook for another 3 hours or so. All the beans should be mushy. The meat should be cooked through, and if attached to bone it should be falling off. (In fact, stir the pot and remove any loose bones you see.) Turn crock pot Off and serve.
Notes:
Dried beans are much cheaper than canned beans, high in protein and nutrients. You can reduce the cooking time by presoaking them in water overnight.
Use whatever kind of beans you like. I favor black-eyed peas but will use pinto beans if that’s what I have. Other people like navy beans or great northern beans for this kind of recipe. Some mixed-bean bags also work well, and those often come with a bean soup seasoning packet that’s fine for ham and beans.
Various types of pork will work in this recipe. Smoked ham hocks or smoked neck bones are especially nice for the extra flavor. Sometimes you can find barbecued ones instead. Pork stew meat, leftover pork or ham, and diced ham are also good. Chopped bacon, particularly flavored ones like pepper-coated or hickory smoked, adds much flavor. Another option is to add a couple tablespoons of bacon grease, if you don’t have (or want) actual meat. You can even save the big hunks of fat and skin from a ham and use those.
Vary spices according to taste. There are lots of different things you can use. I like to use Hawaiian red salt, Himalayan pink salt, or any flavor of smoked salt with pork. If you use a very salty cut of meat, then you should reduce or eliminate the salt from the spice list.
This recipe was originally published in The Wordsmith's Forge on 9/6/09, then revised for reprint 6/24/11.
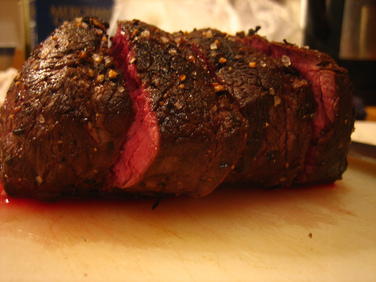
Honkin' Good Venison Roast
Ingredients:
2 Granny Smith apples
2 Vidalia onions
1 bay leaf
salt
pepper
1 teaspoon dried thyme
1/2 teaspoon rubbed sage
9 juniper berries
1/2 cup goose fat
3 lb. venison roast
Directions:
Chop 1 Granny Smith apple into bite-sized chunks and put the chunks in a medium bowl. Chop the second apple and put it into a second bowl.
Chop 1 Vidalia onion into bite-sized chunks and put the chunks into one of the apple bowls. Chop the second onion and put it into the second bowl. Stir the bits together evenly.
Dump one of the bowls into the crock pot. Add 1 bay leaf. Sprinkle with salt and pepper. Cover the crock and turn on Low.
In a mortar and pestle, combine 1 teaspoon dried thyme, 1/2 teaspoon rubbed sage, and 9 juniper berries. Crush and mix thoroughly.
Put 1/2 cup goose fat into a small bowl. Add the mixed herbs. Stir with pastry brush.
Rinse and pat dry a 3 lb. venison roast. Sprinkle with salt and pepper. Brush the herbed goose fat over the top and sides of the meat, then flip it over and lay it in the crock pot atop the apple-onion bits. Brush or pour the remaining herbed goose fat over the meat so that all surfaces are well coated.
Dump the second bowl of apple-onion bits over the roast, covering as much of it as possible. Dust with salt and pepper. Put the lid back on.
Cook on Low for 4-5 hours. Venison should flake easily with a fork. Apples and onions will cook down to slush.
Notes:
If you don't have Granny Smith apples, any large tart cooking apple should work. Similarly the Vidalia onions can be replaced with some other sweet onion.
Dried herbs work better than fresh herbs for mixing into a base to spread on meat. This particular blend is optimized for venison and goose.
This recipe is really designed around the venison and the goose fat. You might try approximating venison with another game meat, or lamb; or the goose fat with duck fat or chicken fat. But venison is a supremely lean meat with a robust flavor, and goose fat is worth every lick of its reputation -- a glorious velvety substance that marries perfectly with the dark notes of the venison. Changing either of those would result in a different dish "inspired by" this one (which is fine). The goose fat used in this recipe, by the way, came from the "Herbal Roast Goose" recipe listed for Ostara.
This recipe was originally published in The Wordsmith's Forge on 5/2/10, then revised for reprint 6/24/11.
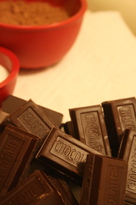
Mayan Chocolate Ice Cream
Ingredients:
one Spicy Maya bar, grated
1/2 cup white sugar
1 1/2 cups half-and-half
1 1/2 cups heavy whipping cream
1 teaspoon vanilla extract
pinch of fine sea salt
Directions:
Chill the Spicy Maya chocolate and break it into several large pieces. Use a very fine grater to grate the pieces one at a time into a small bowl, leaving the rest in the refrigerator until needed. Set the grated chocolate aside briefly.
In medium saucepan, combine 1/2 cup white sugar and 1 1/2 cups half-and-half. Stir over medium heat until bubbles just begin to form. Lower heat slightly and sprinkle in the grated chocolate bit by bit, stirring until chocolate dissolves.
Remove from heat; cool to room temperature, stirring occasionally. (This can be speeded by setting the pan in the freezer for 5 minutes.) Stir in 1 1/2 cups heavy whipping cream and 1 teaspoon vanilla extract.
Pour the mixture into the ice cream maker and process for 35 minutes. Transfer to freezer-safe container and freeze overnight so the flavors can marry.
Notes:
The Spicy Maya bar is produced by Chuao Chocolatier and described as "infused with pasilla chile, cayenne pepper, and cinnamon" with 60% cacao, 2.8 oz. I am not a fan of dark chocolate nor of picante food, but I greatly admire this candy bar. Its heat is immediately apparent.
Cold chocolate is easier to grate than warm chocolate. This is why you should put the candy bar in the refrigerator, and work with one piece at a time, so it doesn't melt in your hands. Also, don't try to grate every last bit of it, or you'll scrape your fingers. Just eat the last nubbin of each piece.
When I made this, I used real Jersey cream and half-and-half from a small dairy that sells to a food co-op. The result is a thick, creamy, velvety, stupendous ice cream with a better texture and flavor than I get from using evaporated milk. You can substitute commercial whipping cream and half-and-half if necessary. Jersey cream seems to freeze harder than commercial whipping cream, but the crystal size is tiny and smooth; if you substitute commercial dairy then the ice cream may be softer but will probably have a coarser grain. Use what you can find or what you like.
Chocolate benefits from a tiny bit of salt to bring out its flavor. Don't use so much that you can actually taste the salt; it's just an enhancer. Sea salt is best because its mineral content is good at bringing up the flavors in chocolate. If you don't have any, plain table salt will do fine.
This recipe produces a very rich, luxurious ice cream with a prevailing mellow middle note and a low bitter note from the chocolate, plus high sparkling notes from the cinnamon and peppers which leave a lingering warmth. It is just barely spicy, with a very modest build to the heat. You probably won't want to eat enough to notice the heat building more than a little, because ice cream this rich satisfies quickly with a small portion.
This is one of those ice creams that needs time for the flavors to blend properly. It's good straight out of the churn, but it is better after sitting in the freezer overnight; the peppers need time to settle into the surrounding milkfat. So if you want this for a special occasion, plan ahead.
This recipe was originally published in The Wordsmith's Forge on 5/18/10, then revised for reprint 6/24/11.
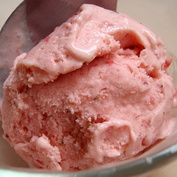
Strawberry Ricecream
Ingredients:
2 cups frozen strawberries
1 tablespoon lemon juice
1 cup organic pure cane sugar, divided
3 cups rice milk
1 teaspoon vanilla extract
Directions:
Thaw the strawberries. If they still have leaves or stems attached, remove all the green parts.
Place thawed strawberries in a small bowl. Add 1/3 cup of the sugar. Add 1 tablespoon lemon juice. Stir. Cover bowl with plastic wrap and leave it to macerate at room temperature for two hours, stirring occasionally.
Pour 3 cups of rice milk into a large mixing bowl. Add the remaining 2/3 cup of sugar. Mix with a whisk until the sugar is dissolved. Add one teaspoon of vanilla extract and mix thoroughly. Carefully add just the juices from the bowl of strawberries. Mix. Re-cover the bowl of strawberries.
Set up the ice cream machine and turn it ON. Pour the rice milk mixture into the ice cream machine and freeze for 35 minutes.
Add the strawberries to the ricecream and freeze for another 5 minutes.
Turn off the ice cream machine. Transfer the ricecream to a container and put it in the freezer to finish setting.
Notes:
For this recipe I used home-picked wild strawberries, organic pure cane sugar, and organic original/unflavored rice milk. Ordinary commercial strawberries would work about as well, although they’d need to be chopped. Other soft fruit such as raspberries or peaches could be substituted easily.
Organic pure cane sugar is a pale buff color, very slightly moist, with a faint flavor of caramel or molasses. If you can’t get it or don’t like it, substitute ordinary white sugar with a tablespoon or so of light brown sugar for flavor.
Rice milk also comes in vanilla flavor and would probably make excellent ricecream. Rice milk behaves differently than cow milk when frozen. First, it’s not opaque; it’s kind of a translucent whitish color. So fruit colors tend to come through more intensely: strawberries make a deeper pink ricecream than they do icecream, and the black raspberry batch of ricecream I made last summer was so deep a purple it was almost black. Second, ricecream sets a lot harder than icecream. It would make excellent popsicles if put into a popsicle mold instead of an ice cream machine. Third, it freezes slower than cow milk so it needs to be churned longer in an ice cream machine.
This recipe was originally published in The Wordsmith's Forge on 10/23/08, then revised for reprint 6/24/11.
Photos used under Creative Commons from OakleyOriginals, Andrew Selvaggio, racheocity, jeffreyw, adactio, SarahSphar, joyosity
